WLAN Station BLE Provisioning with AWS cloud#
1. Purpose / Scope#
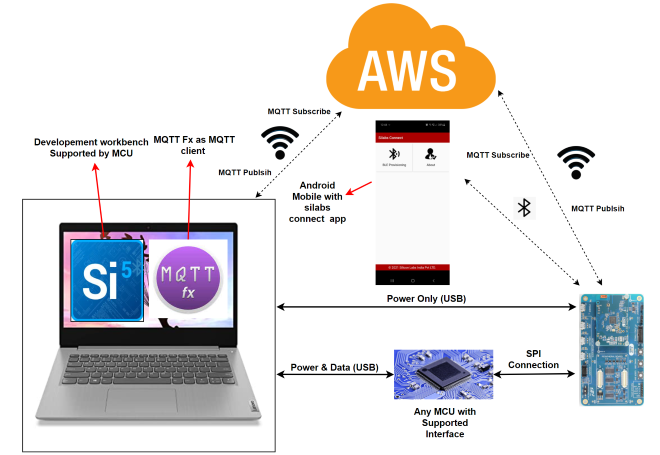
This example demonstrates how to configure/connects RS9116W EVK to get the WLAN connection functionality using BLE provisioning. In this application, the Module starts advertising and with BLE Provisioning the Access Point details are fetched
The RS9116W EVK module is configured as a station, which associates to an access point and then communicates with an AWS server using MQTT,
2. Prerequisites / Setup Requirements#
Before running the application, the user will need the following things to setup.
2.1 Hardware Requirements#
Windows PC with Host interface (UART / SPI).
Silicon labs RS9116 Wi-Fi Evaluation Kit
Host MCU Eval Kit. This example has been tested with:
Silicon labs WSTK + EFR32MG21
Wireless Access point
Android Mobile Phone with Silicon labs Connect App.
(or)
Windows PC with windows Silicon labs connect application.
2.2 Software Requirements#
Embedded Development Environment
For STM32, use licensed Keil IDE
For Silicon Labs EFx32, use the latest version of Simplicity Studio
User can install any of the below apps to verify WLAN Station BLE Provisioning.
Install Android based Silicon labs Connect APK:
Access the apk provided in the path:
<SDK>/utilities/Silicon_lab_connectApp.apk
Install windows Silicon labs connect application in laptop.
Refer the application provided in the path:
<SDK>/utilities/windows_ble_provisioning_appFollow the instructions provided in the document:
<SDK>/utilities/windows_ble_provisioning_app/Installation_steps_to_run_silabs_connect_windows_application.docx
3. Application Build Environment#
3.1 Platform#
The Application can be built and executed on below Host platforms
3.2 Host Interface#
By default, the application is configured to use the SPI bus for interfacing between Host platforms and the RS9116W EVK.
The SAPI driver provides APIs to enable other host interfaces if SPI is not suitable for your needs.
3.3 Project Configuration#
The Application is provided with the project folder containing Keil and Simplicity Studio project files.
Keil Project:
The Keil project can be executed on STM32 platform.
Project path:
<SDK>/examples/snippets/wlan_ble/wlan_station_ble_provisioning_AWS/projects/wlan_station_ble_provisioning_AWS-nucleo-f411re.uvprojx
Simplicity Studio:
The Simplicity Studio project can be executed on EFR32MG21.
Project path:
If the Radio Board is BRD4180A or BRD4181A, then access the path
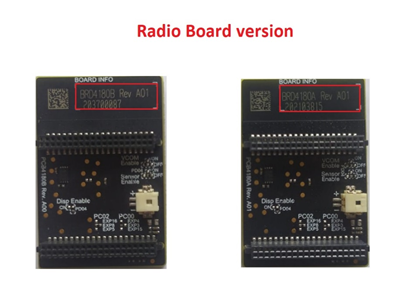
<SDK>/examples/snippets/wlan_ble/wlan_station_ble_provisioning_AWS/projects/wlan_station_ble_provisioning_AWS/projects-brd4180a-mg21.slsprojIf the Radio Board is BRD4180B or BRD4181B, then access the path
<SDK>/examples/snippets/wlan_ble/wlan_station_ble_provisioning_AWS/projects/wlan_station_ble_provisioning_AWS/projects-brd4180b-mg21.slsprojUser can find the Radio Board version as given below
3.4 Bare Metal Support#
This application supports only bare metal configuration. By default, the application project files (Keil and Simplicity Studio) are provided with bare metal environment in the SDK.
4. Application Configuration Parameters#
The application can be configured to suit your requirements and development environment. Read through the following sections and make any changes needed.
4.1 Open rsi_wlan_app.c file and update/modify following macros
Modify the MQTT topics and give different names for both topics RS9116 is subscribed to MQTT_TOPIC1 and publishing to MQTT_TOPIC2.
MQTT web application is subscribed to MQTT_TOPIC2 and publishing on MQTT_TOPIC1.
#define MQTT_TOPIC1 "$aws/things/SmartLockWebApp-v01/shadow/update/device_status"
#define MQTT_TOPIC2 "$aws/things/SmartLockWebAppv01/shadow/update/delta/temperature_reading" NOTE: If you would like to change the topic names, then you can modify only the last keyword of the topic, which are device_status and temperature_reading.
To configure the IP address
Memory length for driver
#define GLOBAL_BUFF_LEN 15000Memory length for the send buffer
#define BUF_SIZE 1400The following parameters are configured if OS is used. WLAN task priority is given and this should be of low priority
#define RSI_WLAN_TASK_PRIORITY 1Driver task priority is given and this should be of the highest priority
#define RSI_DRIVER_TASK_PRIORITY 1WLAN Task stack size is configured by this macro
#define RSI_WLAN_TASK_STACK_SIZE 500Driver Task stack size is configured by this macro
#define RSI_DRIVER_TASK_STACK_SIZE 5004.1.1 Open rsi_wlan_config.h file and update/modify the following macros
#define CONCURRENT_MODE RSI_DISABLE
#define RSI_FEATURE_BIT_MAP (FEAT_SECURITY_OPEN | FEAT_AGGREGATION | FEAT_ULP_GPIO_BASED_HANDSHAKE)
#define RSI_TCP_IP_BYPASS RSI_DISABLE
#define RSI_TCP_IP_FEATURE_BIT_MAP (TCP_IP_FEAT_DHCPV4_CLIENT | TCP_IP_FEAT_SSL | TCP_IP_FEAT_DNS_CLIENT | TCP_IP_TOTAL_SOCKETS_1 | TCP_IP_FEAT_EXTENSION_VALID)
#define RSI_CUSTOM_FEATURE_BIT_MAP FEAT_CUSTOM_FEAT_EXTENTION_VALID
#define RSI_EXT_CUSTOM_FEATURE_BIT_MAP (EXT_FEAT_384K_MODE | EXT_FEAT_LOW_POWER_MODE | EXT_FEAT_RSA_KEY_WITH_4096_SUPPORT | EXT_FEAT_SSL_CERT_WITH_4096_KEY_SUPPORT)
define RSI_EXT_TCPIP_FEATURE_BIT_MAP ( EXT_DYNAMIC_COEX_MEMORY | EXT_TCP_IP_FEAT_SSL_MEMORY_CLOUD | CONFIG_FEAT_EXTENTION_VALID)
define RSI_CONFIG_FEATURE_BITMAP RSI_FEAT_SLEEP_GPIO_SEL_BITMAP
define RSI_BT_FEATURE_BITMAP (BT_RF_TYPE | ENABLE_BLE_PROTOCOL)
define RSI_BAND RSI_BAND_2P4GHZ Note:
rsi_wlan_config.h file is already set with the desired configuration in respective example folders, user need not change for each example.
4.2 Open rsi_ble_app.c file and update/modify following macros
Configuring the BLE Application
RSI_BLE_CHAR_SERV_UUID refers to the attribute type of the characteristics to be added in a service.
#define RSI_BLE_CHAR_SERV_UUID 0x2803 RSI_BLE_CLIENT_CHAR_UUID refers to the attribute type of the client characteristics descriptor to be added in a service.
#define RSI_BLE_CLIENT_CHAR_UUID 0x2902 RSI_BLE_NEW_SERVICE_UUID refers to the attribute value of the newly created service.
#define RSI_BLE_NEW_SERVICE_UUID 0xAABB RSI_BLE_ATTRIBUTE_1_UUID refers to the attribute type of the first attribute under this service (RSI_BLE_NEW_SERVICE_UUID).
#define RSI_BLE_ATTRIBUTE_1_UUID 0x1AA1 RSI_BLE_ATTRIBUTE_2_UUID refers to the attribute type of the second attribute under this service (RSI_BLE_NEW_SERVICE_UUID).
#define RSI_BLE_ATTRIBUTE_2_UUID 0x1BB1 RSI_BLE_ATTRIBUTE_3_UUID refers to the attribute type of the third attribute under this service (RSI_BLE_NEW_SERVICE_UUID).
#define RSI_BLE_ATTRIBUTE_3_UUID 0x1CC1 RSI_BLE_MAX_DATA_LEN refers to the Maximum length of the attribute data.
#define RSI_BLE_MAX_DATA_LEN 20 RSI_BLE_APP_DEVICE_NAME refers to the name of the Silicon Labs device to appear during scanning by remote devices.
#define RSI_BLE_APP_DEVICE_NAME "BLE_CONFIGURATOR"The following are the non-configurable macros in the application.
RSI_BLE_ATT_PROPERTY_READ is used to set the READ property to an attribute value.
#define RSI_BLE_ATT_PROPERTY_READ 0x02 RSI_BLE_ATT_PROPERTY_WRITE is used to set the WRITE property to an attribute value.
#define RSI_BLE_ATT_PROPERTY_WRITE 0x08 RSI_BLE_ATT_PROPERTY_NOTIFY is used to set the NOTIFY property to an attribute value.
#define RSI_BLE_ATT_PROPERTY_NOTIFY 0x10 BT_GLOBAL_BUFF_LEN refers to the number of bytes required by the application and the driver.
#define BT_GLOBAL_BUFF_LEN 150004.3 Open aws_iot_config.h file and change the AWS_IOT_MQTT_CLIENT_ID to your choice (Make sure this is unique, if more than one user use has same client id it might get conflict at server side).
//AWS Host name
#define AWS_IOT_MQTT_HOST "a25jwtlmds8eip-ats.iot.us-east-2.amazonaws.com"
//default port for MQTT
#define AWS_IOT_MQTT_PORT "8883"
#define AWS_IOT_MQTT_CLIENT_ID "Redp"
// Thing Name of the Shadow this device is associated with
#define AWS_IOT_MY_THING_NAME "AWS-IoT-C-SDK" 4.4 To Load Certificate
rsi_wlan_set_certificate() API expects the certificate in the form of linear array. Convert the pem certificate into linear array form using python script provided in the SDK <SDK>/resources/certificates/certificate_script.py.
For example : If the certificate is ca-certificate.pem, enter the command in the following way: python certificate_script.py ca-certificate.pem The script will generate ca-certificate.pem in which one linear array named ca-certificate contains the certificate. Root CA certificate, Device private key and Device client certificate needs to be converted as mentioned above
After the conversion, place the converted files in <SDK>/resources/certificates/ path and include the certificate files in rsi_wlan_app.c
Replace the default Device certificate and Private key certificate include in the application with the converted pem file name.
// Certificate includes
#include "aws_client_certificate.pem.crt.h"
#include "aws_client_private_key.pem.key.h"
Replace the default Device certificate and Private key certificate given in `rsi_wlan_set_certificate()` API in the application with the converted pem array.
// Load Security Certificates
status = rsi_wlan_set_certificate(RSI_SSL_CLIENT, aws_client_certificate, (sizeof(aws_client_certificate) - 1));
status =
rsi_wlan_set_certificate(RSI_SSL_CLIENT_PRIVATE_KEY, aws_client_private_key, (sizeof(aws_client_private_key) - 1));NOTE : For AWS connectivity, StarField Root CA Class 2 certificate has the highest authority being at the top of the signing hierarchy.
The StarField Root CA Class 2 certificate is an expected/required certificate which usually comes pre-installed in the operating systems and it plays a key part in certificate chain verification when a device is performing TLS authentication with the IoT endpoint.
On RS9116 device, we do not maintain root CA trust repository due to memory constraints, so it is mandatory to load StarField Root CA Class 2 certificate for successful mutual authentication to AWS server.
The certificate chain sent by AWS server is as below: id-at-commonName=Amazon,id-at-organizationalUnitName=Server CA 1B,id-at-organizationName=Amazon,id-at-countryName=US id-at-commonName=Amazon Root CA 1,id-at-organizationName=Amazon,id-at-countryName=US id-at-commonName=Starfield Services Root Certificate Authority ,id-at-organizationName=Starfield Technologies, Inc.,id-at-localityName=Scottsdale,id-at- stateOrProvinceName=Arizona,id-at-countryName=US)
On RS9116 to authenticate the AWS server, firstly Root CA is validated (validate the Root CA received with the Root CA loaded on the device). Once the Root CA is validation is successful , other certificates sent from the AWS server are validated. RS9116 don't authenticate to AWS server if intermediate CA certificates are loaded instead of StarField Root CA Class 2 certificate and would result in Handshake error. StarField Root CA Class 2 certificate is at https://certs.secureserver.net/repository/sf-class2-root.crt
Reference links : https://aws.amazon.com/blogs/security/how-to-prepare-for-aws-move-to-its-own-certificate-authority/
5. Testing the Application#
Follow the below steps for the successful execution of the application.
5.1 Loading the RS9116W Firmware#
Refer Getting started with PC to load the firmware into RS9116W EVK. The firmware binary is located in <SDK>/firmware/
5.2 Building the Application on the Host Platform#
5.2.1 Using STM32#
Refer STM32 Getting Started
Open the project
<SDK>/examples/snippets/wlan_ble/wlan_station_ble_provisioning_AWS/projects/wlan_station_ble_provisioning_AWS-nucleo-f411re.uvprojxin Keil IDE.Build and Debug the project
Check for the RESET pin:
If RESET pin is connected from STM32 to RS9116W EVK, then user need not press the RESET button on RS9116W EVK before free run.
If RESET pin is not connected from STM32 to RS9116W EVK, then user need to press the RESET button on RS9116W EVK before free run.
Free run the project
Then continue the common steps from Section 5.3
5.2.2 Using EFX32#
Refer EFx32 Getting Started
Import the project from
<SDK>/examples/snippets/wlan_ble/wlan_station_ble_provisioning_AWS/projectsSelect the appropriate .slsproj as per Radio Board type mentioned in Section 3.3
Compile and flash the project in to Host MCU
Debug the project
Check for the RESET pin:
If RESET pin is connected from STM32 to RS9116W EVK, then user need not press the RESET button on RS9116W EVK before free run
If RESET pin is not connected from STM32 to RS9116W EVK, then user need to press the RESET button on RS9116W EVK before free run
Free run the project
Then continue the common steps from Section 5.3
5.3 Execution of AWS IoT with BLE Provisioning#
5.3.1 BLE Provisioning with Windows Application#
Configure the Access point with internet connection in OPEN/WPA-PSK/WPA2-PSK mode to connect the RS9116W EVK in STA mode.
Connect any serial console for prints.
Note Turn on BT in the PC.
Go to folder
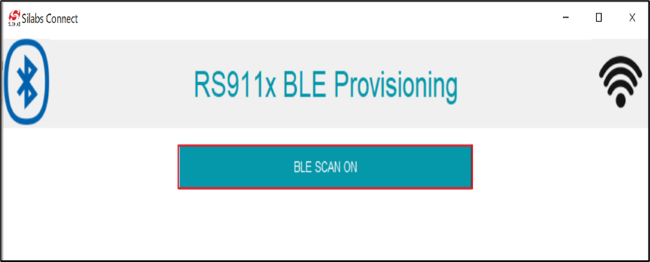
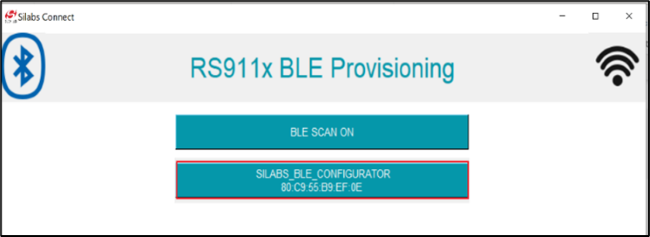
<SDK>/utilities/windows_ble_provisioning_appand Run Silabs_Connect.py in the command prompt.Executing the application in the command prompt as stated in the above point will open the GUI (with the “BLE SCAN ON� button.
Check for the configured name in the BLE scanned list and connect to the ‘SILABS_BLE_CONFIGURATOR’, by clicking on it.
Once the BLE connection is successful, Wi-Fi access points scan list will be populated. Click on the Access Point (AP) SSID and enter the password of the AP, to which you would like to connect.
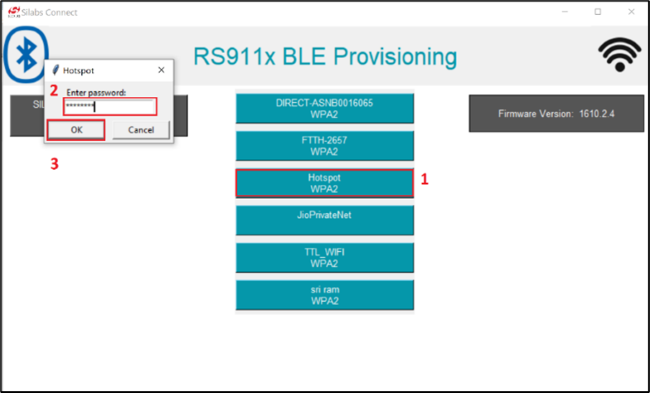
Note Now go to section 5.3.3 MQTT connection for AWS connection
5.3.2 BLE Provisioning with Android Application#
Silicon Labs Connect app is available in the
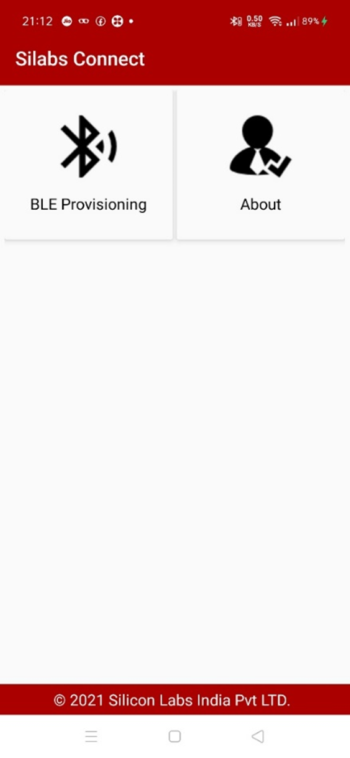
<SDK>/utilities/folder. Currently, this app will be available for Android devices only.Once the application gets executed, launch the Android application which you have already installed on Android mobile.
Click on BLE Provisioning.
It will scan for the RS9116 module, and it appears in the list. For example, “SILABS_BLE_Configurator� on the UI, select this.
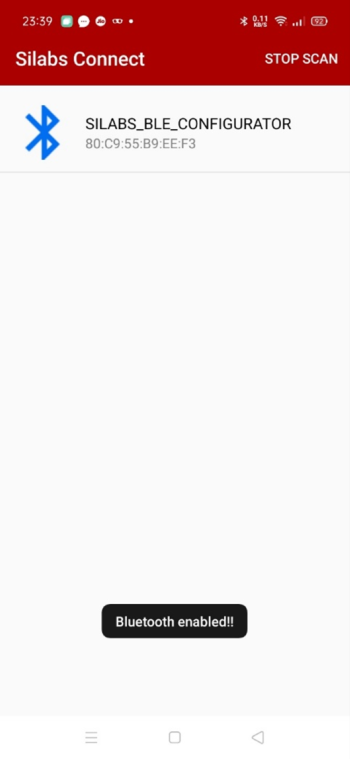
Now, RS9116 module will start as a station and scan for the access points (AP) nearby.
Once the list of AP scan results is displayed on the screen, you can select the SSID of the AP to which you want to connect.
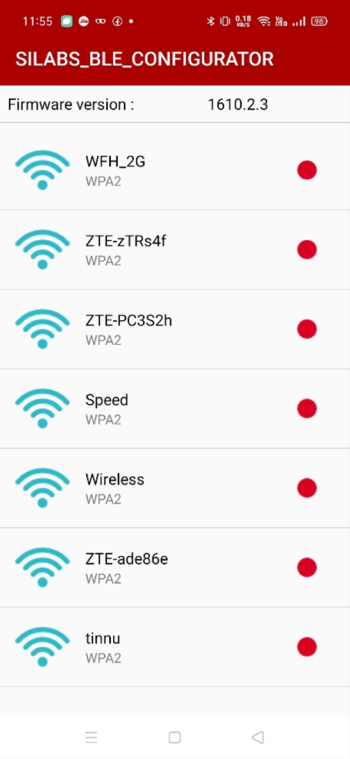
Click on the SSID of the AP, enter “password� if the AP is in security mode. Click on “Connect� to associate with the access point.
Once Silicon labs RS9116 module is connected to the access point, you can notice on the GUI as below.

This completes the BLE provisioning using Android application, next step is the MQTT communication.
5.3.3 MQTT Connection#
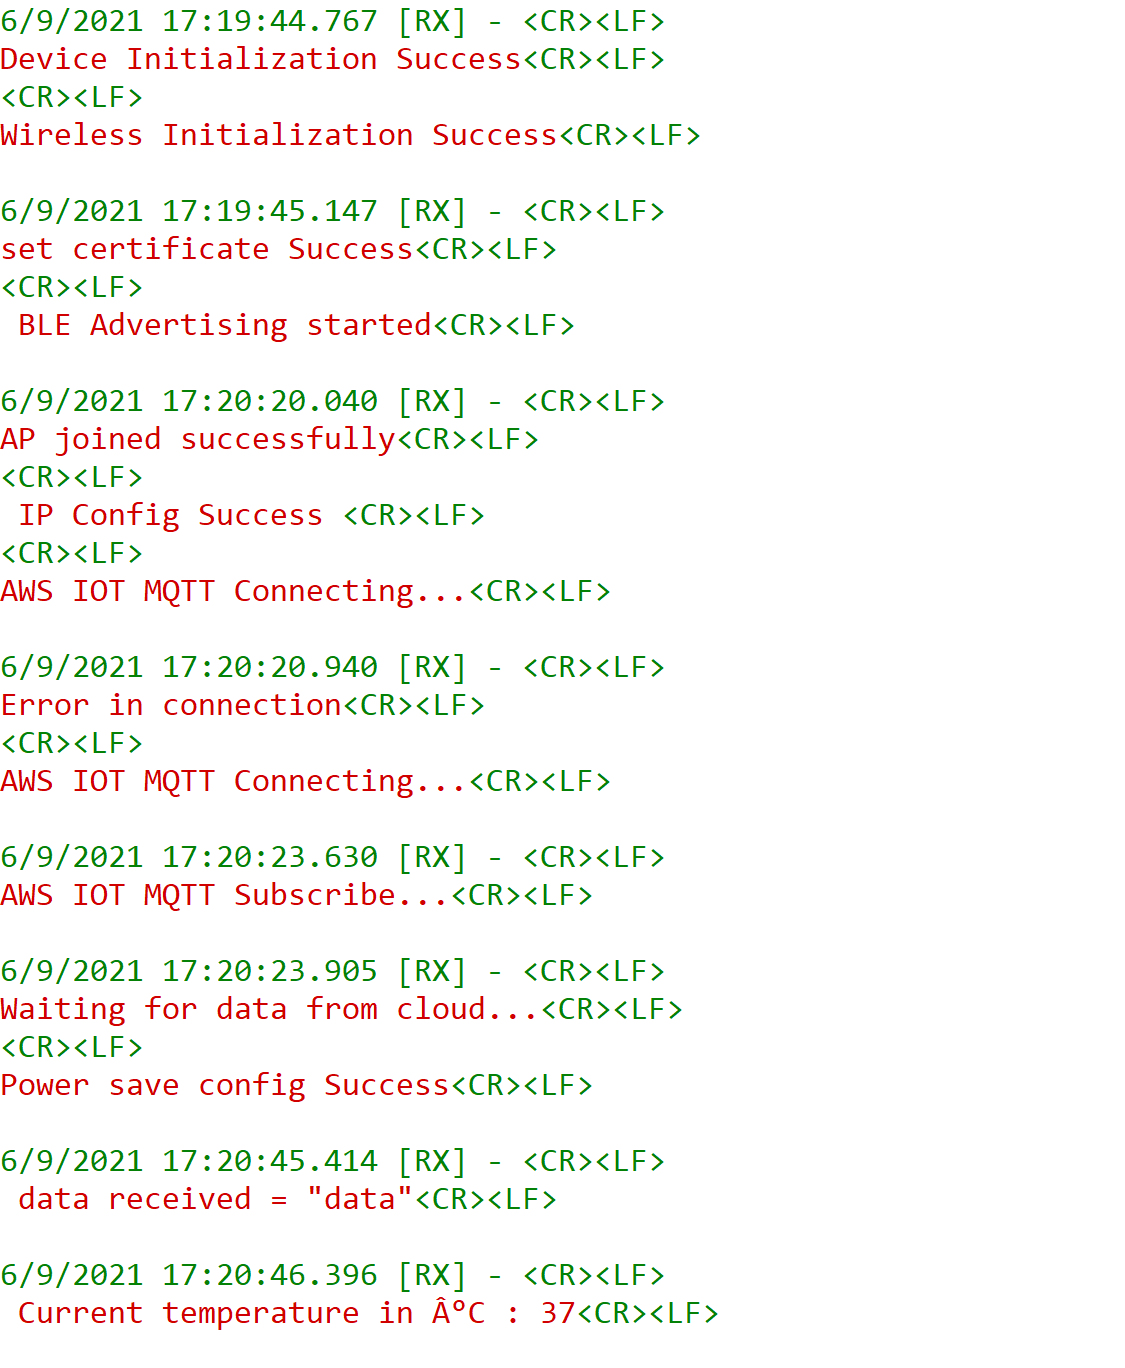
Once MQTT connection completed , device subscribed to specific Topic and waits for data from the Cloud. if any data received through AWS cloud from subscribed clients, then module publishes temperature sensor reading to MQTT client in case of EFR32. While in case of STM32 random temperature readings ranges from 25-40 is published to MQTT client through AWS cloud.
You can use any MQTT client and connect to the AWS cloud, for subscribe and publishing messages.