HTTP/HTTPS OTA#
1. Purpose / Scope#
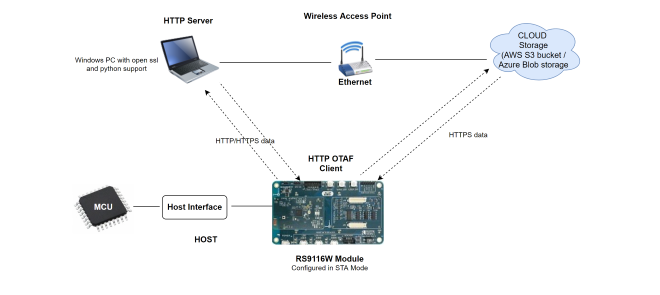
This application demonstrates how to update new firmware to RS9116W EVK using remote HTTP/s server or cloud storage server.
In this application, RS9116W EVK connects to Access Point as HTTP/HTTPS client and establishes connection with HTTP/s server (Apache server) or the cloud storage server (i.e., AWS S3 bucket/Azure Blob storage). After successful HTTP/s connection, RS9116W EVK sends firmware file request (HTTP GET Request) to remote server and server responds with Firmware file.
The server transferred firmware file gets loaded/updated in the RS9116 module flash memory. After successful firmware update, HTTP/s OTA API returns success response.
2. Prerequisites / Setup Requirements#
Before running the application, set up the following.
2.1 Hardware Requirements#
Windows PC with Host interface (UART / SPI)
Silicon Labs RS9116 Wi-Fi Evaluation Kit
Host MCU Eval Kit. This example has been tested with:
Silicon Labs WSTK + EFR32MG21
Wireless Access point
2.2 Software Requirements#
Embedded Development Environment
For STM32, use licensed Keil IDE
For Silicon Labs EFx32, use the latest version of Simplicity Studio
Install and configure Wamp-Apache HTTP server, refer to Appendix section 6.3 Configuring and uploading firmware on Apache HTTP.
Install and configure Wamp-Apache HTTPs server, refer to Appendix section 6.4 Configuring and uploading firmware on Apache HTTPs.
Configure AWS S3 bucket, refer to Appendix setion 6.1 Configuring AWS S3 Bucket.
Configure Azure Blob storage, refer to Appendix section 6.2 Configuring Azure Blob Storage.
3. Application Build Environment#
3.1 Platform#
The Application can be built and executed on below Host platforms
3.2 Host Interface#
By default, the application is configured to use the SPI bus for interfacing between Host platforms and the RS9116W EVK.
The SAPI driver provides APIs to enable other host interfaces if SPI is not suitable for your needs.
3.3 Project Configuration#
The Application is provided with the project folder containing Keil and Simplicity Studio project files.
Keil Project
The Keil project is used to evaluate the application on STM32.
Project path:
<SDK>/examples/snippets/wlan/http_otaf/projects/http_otaf-nucleo-f411re.uvprojx
Simplicity Studio
The Simplicity Studio project is used to evaluate the application on EFR32MG21.
Project path:
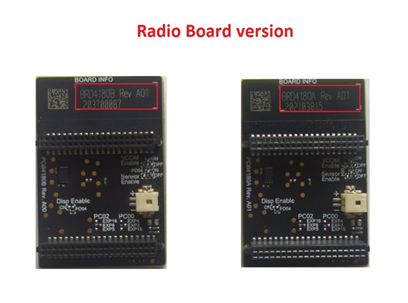
If the Radio Board is BRD4180A or BRD4181A, then access the path
<SDK>/examples/snippets/wlan/http_otaf/projects/http_otaf-brd4180a-mg21.slsprojIf the Radio Board is BRD4180B or BRD4181B, then access the path
<SDK>/examples/snippets/wlan/http_otaf/projects/http_otaf-brd4180b-mg21.slsprojUser can find the Radio Board version as given below
3.4 Bare Metal Support#
This application supports only bare metal environment. By default, the application project files (Keil and Simplicity studio) are provided with bare metal configuration in the SDK.
4. Application Configuration Parameters#
The application can be configured to suit user requirements and development environment. Read through the following sections and make any changes needed.
4.1 Open rsi_http_otaf_app.c file#
4.1.1 User must update the below common parameters#
SSID refers to the name of the Access point.
#define SSID "SILABS_AP"CHANNEL_NO refers to the channel in which AP would be started
#define CHANNEL_NO 0SECURITY_TYPE refers to the type of security. Generally Access point supports Open, WPA, WPA2 securities.
Valid configuration is:
RSI_OPEN - For OPEN security mode
RSI_WPA - For WPA security mode
RSI_WPA2 - For WPA2 security mode
#define SECURITY_TYPE RSI_WPA2PSK refers to the secret key of the Access point(applies when AP is configured in WPA/WPA2 security modes)
#define PSK "1234567890"DHCP_MODE refers the way of configuring IP address to Silicon Labs module
1-Enables DHCP mode (gets the IP from DHCP server)
0-Disables DHCP mode
Desired configuration :
#define DHCP_MODE 1If DHCP Mode is disabled configure a static IP address using the following macros. These values are in long format and in little endian order. For example an address of "192.168.10.1" is represented by a value of 0x010AA8C0.
#define DEVICE_IP 0X010AA8C0IP address of the gateway should also be in long format and in little endian byte order
Example: To configure "192.168.10.1" as Gateway, update the macro GATEWAY as 0x010AA8C0
#define GATEWAY 0x010AA8C0IP address of the network mask should also be in long format and in little endian byte order
Example: To configure "255.255.255.0" as network mask, update the macro NETMASK as 0x00FFFFFF
#define NETMASK 0x00FFFFFFNote: In AP mode, configure same IP address for both DEVICE_IP and GATEWAY macros.
4.1.2 User must update the below server configuration parameters#
Based on the type of server (Apache/AWS S3 bucket/Azure Blob Storage) from which firmware files needs to be downloaded, the below mentioned parameters needs to be configured. Configure FLAGS to choose the version and security type to be enabled
Valid configurations are :
Enable IPv6 set this bit in FLAGS, Default is IPv4
#define HTTPV6 BIT(0) Set HTTPS_SUPPORT to use HTTPS feature
#define HTTPS_SUPPORT BIT(1) Set HTTP_V_1_1 to use HTTP version 1.1
#define HTTP_V_1_1 BIT(6) HTTP_PORT refers to HTTP Server port number
HTTP_SERVER_IP_ADDRESS refers to HTTP Server IP address
HTTP_URL refers to HTTP resource name
HTTP_HOSTNAME refers to HTTP server hostname
HTTP_EXTENDED_HEADER refers to HTTP extended header. If NULL default extented header is filled
USERNAME refers to the username to be used to access the HTTP resource
PASSWORD refers to the password to be used to access the HTTP resource
For Apache HTTP Server
//Sample configurations
#define FLAGS 0
#define HTTP_PORT 80
#define HTTP_SERVER_IP_ADDRESS "192.168.xxx.xxx"
#define HTTP_URL "Firmware/firmware.rps" //firwmare file name to download
#define HTTP_HOSTNAME "192.168.xxx.xxx"
#define USERNAME "admin"
#define PASSWORD "admin"For Apache HTTPS Server
Include Root certificate pem file for SSL connection
Provide the PC IP where Apache server is running in HTTP_SERVER_IP_ADDRESS
Provide the firmware package name uploaded in Apache server in HTTP_URL
//Sample configurations
#include "cacert.pem"
#define FLAGS HTTPS_SUPPORT
#define HTTP_PORT 443
#define HTTP_SERVER_IP_ADDRESS "192.168.xxx.xxx"
#define HTTP_URL "Firmware/firmware.rps" //firwmare file name to download
#define HTTP_HOSTNAME "192.168.xxx.xxx"
#define USERNAME "admin"
#define PASSWORD "admin"For AWS S3 Bucket
Include Digicert (Baltimore CyberTrust Root) certificate file for SSL connection
Note : The certificate authority for Amazon AWS S3 is Digicert, hence we need to include Digicert Root (Baltimore CyberTrust Root) certification for SSL connection to be successful. This certificate is already included in the SDK in linear array format "http_batimore_ca.pem.h" which can be directly used for SSL connection to AWS S3.
Extract the hostname from AWS S3 bucket URL
https://<Your-S3-Bucket-name>.s3.<Your-nearest-S3-location>.amazonaws.com/firmware.rpsand provide it in hostname
Example: For S3 bucket URL https://example.s3.ap-south-1.amazonaws.com/firmware.rps", hostname will be "example.s3.ap-south-1.amazonaws.com"
Extract the firmware package name from URL
https://<Your-S3-Bucket-name>.s3.<Your-nearest-S3-location>.amazonaws.com/firmware.rpsand provide it in HTTP_URL
Example: For S3 bucket URL "https://example.s3.ap-south-1.amazonaws.com/firmware.rps", HTTP_URL will be "firmware.rps"
//Sample configurations
#include "http_baltimore_ca.pem.h" //Baltimore CyberTrust Root
#define FLAGS HTTPS_SUPPORT
#define HTTP_PORT 443
#define HTTP_URL "firmware.rps" //firwmare file name to download
#define USERNAME ""
#define PASSWORD ""
char *hostname ="example.s3.ap-south-1.amazonaws.com"; Note: The USERNAME and PASSWORD is provided as empty string "" since the S3 bucket URL created has public access provided. Refer Appendix section 6.1 on how to upload Firmware in AWS S3 Bucket.
For Azure Blob storage
Include Digicert (Baltimore CyberTrust Root) certificate file for SSL connection
Note : The certificate authority for Azure Blob storage is Digicert, hence we need to include Digicert Root (Baltimore CyberTrust Root) certification for SSL connection to be successful. This certificate is already included in the SDK in linear array format "http_batimore_ca.pem.h" which can be directly used for SSL connection to Azure Blob storage.
Extract the hostname from Azure Blob storage URL
https://<Your-Blob-Name>.blob.core.windows.net/rps/firmware.rpsand provide it in hostname
Example: For Azure Blob storage URL "https://example.blob.core.windows.net/example_directory/firmware.rps", hostname will be "example.blob.core.windows.net"
Extract the firmware package name from URL
https://<Your-Blob-Name>.blob.core.windows.net/rps/firmware.rpsand provide it in HTTP_URL
Example: For Azure Blob storage URL "https://example.blob.core.windows.net/example_directory/firmware.rps", HTTP_URL will be "rps/firmware.rps"
//Sample configurations
#include "http_baltimore_ca.pem.h" //Baltimore Root CA
#define FLAGS HTTPS_SUPPORT
#define HTTP_PORT 443
#define HTTP_URL "rps/firmware.rps" //firwmare file name to download
#define USERNAME ""
#define PASSWORD ""
char *hostname ="example.blob.core.windows.net";Note: The USERNAME and PASSWORD is provided as empty string "" since the Azure Blob storage URL created has public access provided. Refer to Appendix section 6.2 on how to upload Firmware in Azure Blob storage
4.2 Open rsi_wlan_config.h file. User can also modify the below parameters as per their needs and requirements.#
For Apache HTTP Server
#define RSI_TCP_IP_FEATURE_BIT_MAP (TCP_IP_FEAT_DHCPV4_CLIENT | TCP_IP_FEAT_HTTP_CLIENT | TCP_IP_FEAT_EXTENSION_VALID)
#define RSI_EXT_TCPIP_FEATURE_BITMAP EXT_FEAT_HTTP_OTAF_SUPPORTFor Apache HTTPS Server
#define RSI_TCP_IP_FEATURE_BIT_MAP (TCP_IP_FEAT_DHCPV4_CLIENT | TCP_IP_FEAT_HTTP_CLIENT| TCP_IP_FEAT_EXTENSION_VALID | TCP_IP_FEAT_SSL)
#define RSI_EXT_TCPIP_FEATURE_BITMAP EXT_FEAT_HTTP_OTAF_SUPPORTFor AWS S3 Bucket/Azure Blob storage
#define RSI_TCP_IP_FEATURE_BIT_MAP (TCP_IP_FEAT_DHCPV4_CLIENT | TCP_IP_FEAT_HTTP_CLIENT| TCP_IP_FEAT_EXTENSION_VALID | TCP_IP_FEAT_SSL | TCP_IP_FEAT_DNS_CLIENT)
#define RSI_EXT_TCPIP_FEATURE_BITMAP (EXT_FEAT_HTTP_OTAF_SUPPORT | EXT_TCP_IP_SSL_16K_RECORD)4.3 To Load Certificate#
rsi_wlan_set_certificate() API expects the certificate in the form of linear array. Convert the pem certificate into linear array form using python script provided in the SDK <SDK>/resources/certificates/certificate_script.py.
For example : If the certificate is ca-certificate.pem, enter the command in the following way: python certificate_script.py ca-certificate.pem The script will generate ca-certificate.pem in which one linear array named ca-certificate contains the certificate.
Root CA certificate needs to be converted as mentioned above.
After the conversion, place the converted file in <SDK>/resources/certificates/ path and include the certificate file in rsi_http_otaf_app.c
For firmware download using HTTPs Apache server, replace the below certificate include in application
// Certificate includes
#include "cacert.pem"
Replace the certificate in `rsi_wlan_set_certificate()` API in the application with the converted pem array.
// Load Security Certificates
status = rsi_wlan_set_certificate(RSI_SSL_CA_CERTIFICATE, cacert, (sizeof(cacert) - 1));Note: For AWS S3/Azure Blob storage use the certificate "http_baltimore_ca.pem.h" included in release pacakge for SSL connection.
5. Testing the Application#
User has to follow the below steps for the successful execution of the application.
5.1 Loading the RS9116W Firmware#
Refer Getting started with a PC to load the firmware into RS9116W EVK. The firmware file is located in <SDK>/firmware/
5.2 Building the Application on the Host Platform#
5.2.1 Using STM32#
Refer Getting started with STM32
Open the project
<SDK>/examples/snippets/wlan/http_otaf/projects/http_otaf-nucleo-f411re.uvprojxBuild and Debug the project
Check for the RESET pin:
If RESET pin is connected from STM32 to RS9116W EVK, then user need not press the RESET button on RS9116W EVK before free run.
If RESET pin is not connected from STM32 to RS9116W EVK, then user need to press the RESET button on RS9116W EVK before free run.
Free run the project
Then continue the common steps from Section 5.3
5.2.2 Using EFX32#
Refer Getting started with EFX32
Open Simplicity Studio and import the project from
<SDK>/examples/snippets/wlan/http_otaf/projectsSelect the appropriate .slsproj as per the Radio Board type mentioned in Section 3.3
Compile and flash the project in to Host MCU
Debug the project
Check for the RESET pin:
If RESET pin is connected from STM32 to RS9116W EVK, then user need not press the RESET button on RS9116W EVK before free run
If RESET pin is not connected STM32 to RS9116W EVK, then user need to press the RESET button on RS9116W EVK before free run
Free run the project
Then continue the common steps from Section 5.3
5.3 Common Steps#
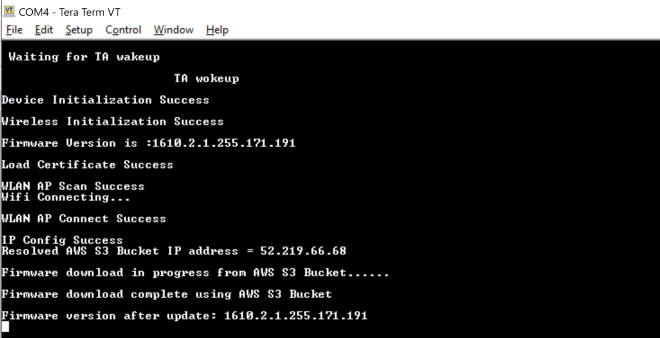
On free run, the application starts downloading firmware from AWS S3 Bucket as "AWS_ENABLE" macro is enabled by default in application.
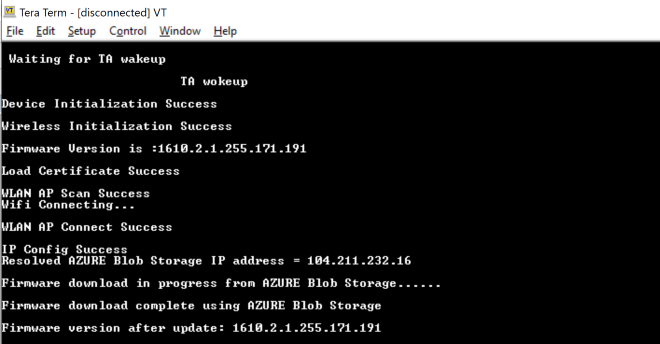
Depending on the requirement user can enable downloading firmware from Azure Blob storage (Enable Macro "AZURE_ENABLE"), else if both AWS and Azure macro is disabled, HTTP/s Apache server can be used to download the firmware (Refer to section 4.1.2 on how to configure HTTP/s parameters).
Below are the logs for successful application execution using AWS S3 Bucket.
Below are the logs for successful application execution using AZURE Blob Storage.
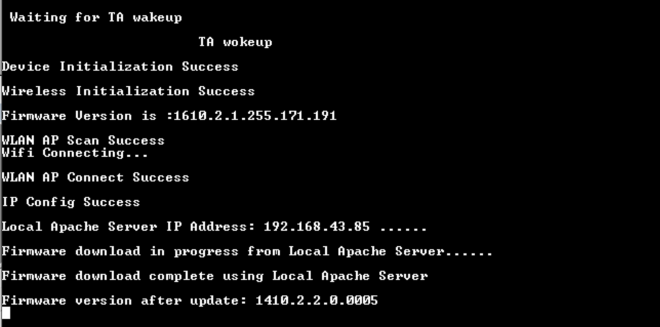
Below are the logs for successful application execution using HTTP/s Local Apache Server.
6 Appendix#
6.1 Configuring AWS S3 Bucket#
Sign into the Amazon S3 console at https://console.aws.amazon.com/s3/
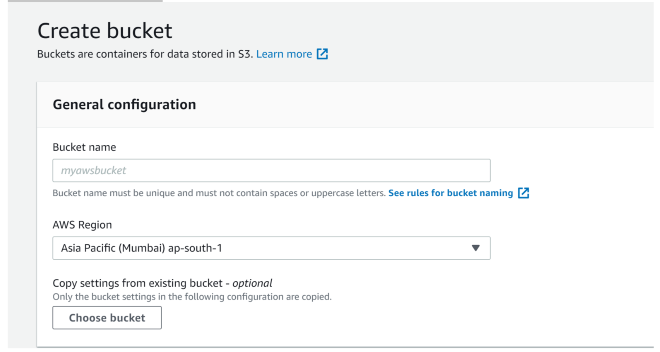
Choose Create bucket

Enter a bucket name
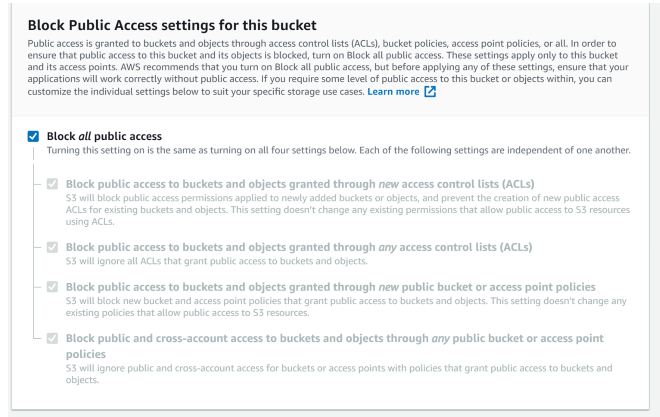
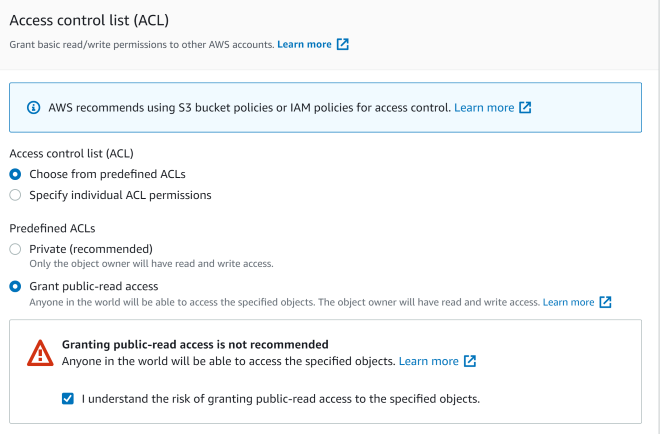
Under Bucket settings for Block Public Access keep Block all public access
Under Bucket Versioning, select Enable to keep all versions in the same bucket

Choose Create bucket

Upload the file in creating bucket
Add the file to the bucket

Setting permission to public access
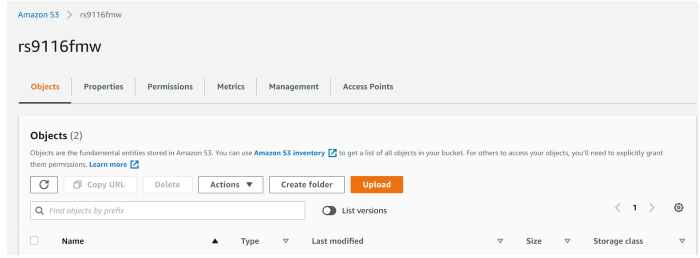
Get the S3 bucket URL inside bucket/properties, like below :
[https://rs9116fmw.s3.ap-south-1.amazonaws.com/firmware.rps]
6.2 Configuring Azure Blob Storage#
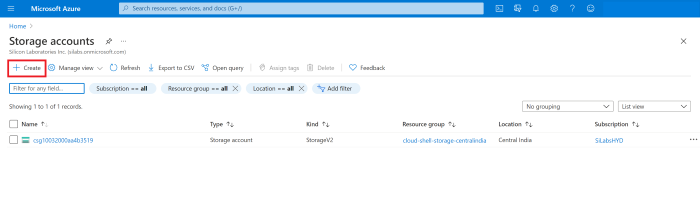
Login to your Azure account and go to Storage Account or search for Storage Account

Open storage account and create a new storage
While creating a storage account select your common Resource Group you have already created and provide a storage account name.
Select preferred location, for the account kind select Blob-Storage and Replication select LRS
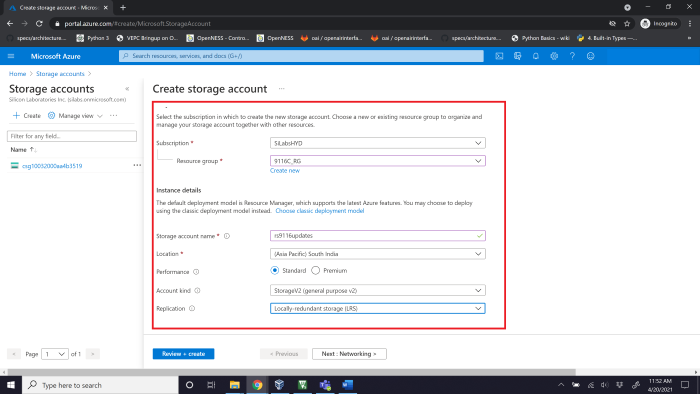
Review and create your storage account
Now download the Windows Storage Explorer here
After installing the storage explorer, open Azure Storage Explorer in your Windows machine and navigate to Account management and add your Azure account.
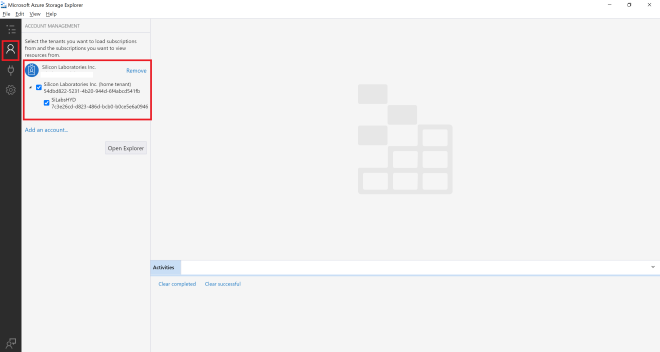
Click on Open connect dialog, where you need to select a Resource from the list as shown below

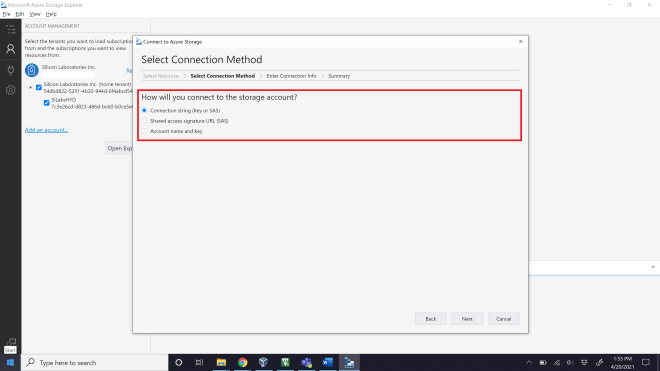
Select Storage account or service, then select connection method as Connection String
In the Azure Portal, navigate to your newly created storage account and select Access Keys, copy the connection string for Key1
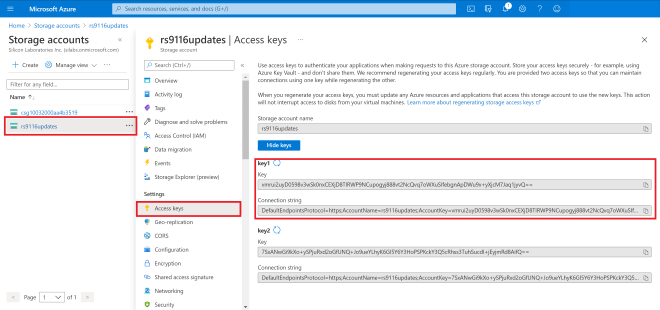
The connection string has to be given in the local Azure Storage Explorer app
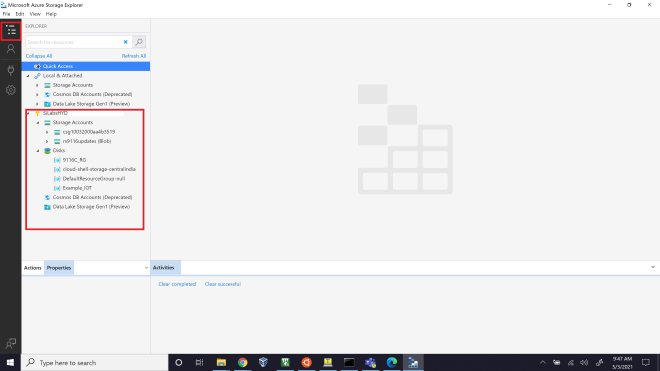
Up on successfully adding, you should now see the EXPLORER tab on your Azure Storage Explorer display all the storages available in your account
In the Azure Portal search for Storage Explorer and work the same thing there also. But it is in preview so better to use Windows Azure Storage Explorer
Create a new blob container as shown below
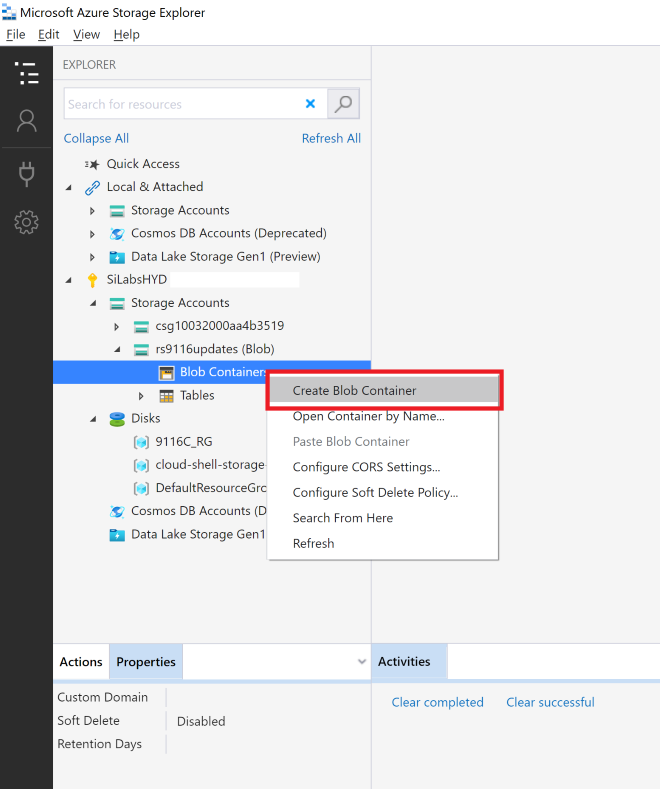
The route folder name you give is quite important as all the further connections happen from here. For this I am choosing a file extension
The name used here is “rps”
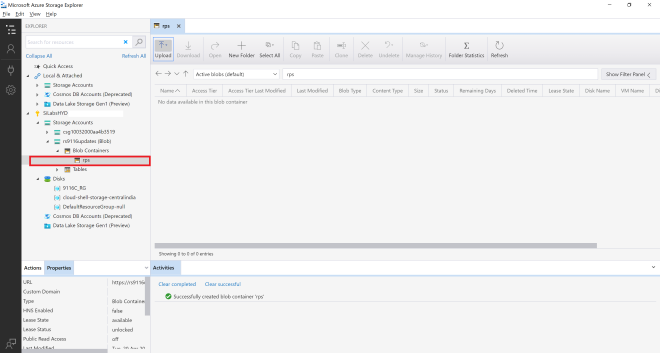
This should create a new folder, which looks like this
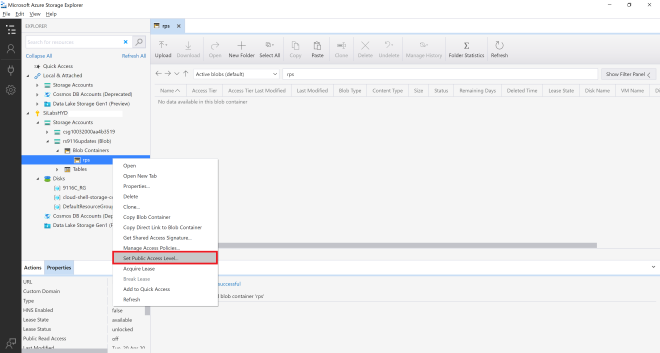
Change the Public Access Level, right click on the new folder and select Set Container Access Level
We can upload the Device Update File
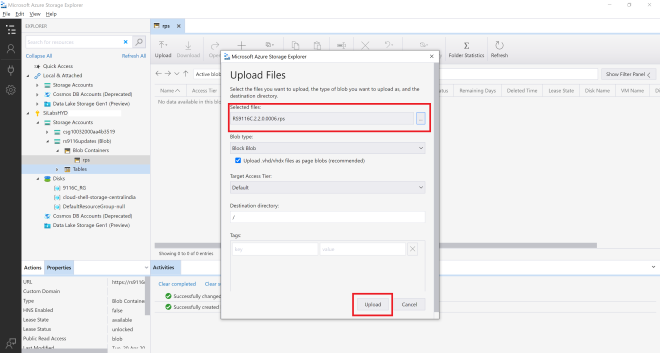
Once done uploading, we can see the file
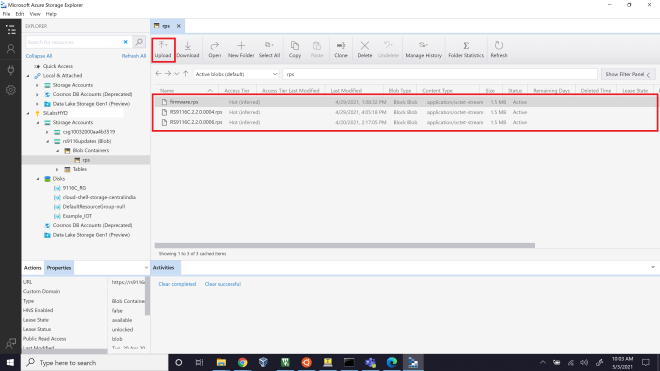
Right click on the uploaded file, then select properties. You will find a URL path.
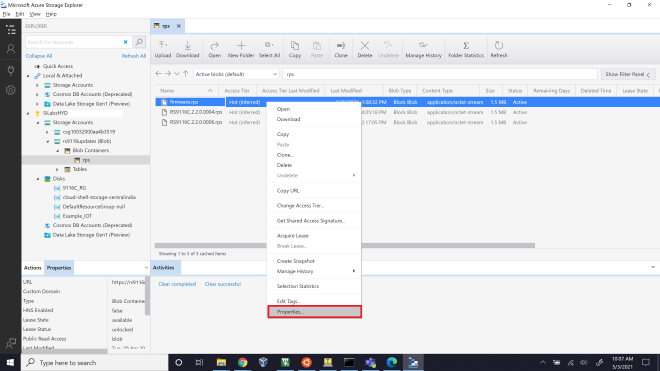
Copy it this link is used for accessing our device update files

By accessing this URL, you can download the Device Update files in application
6.3 Configuring and Uploading Firmware on Apache HTTP:#
Download and Install Wamp-Apache Server
Open the below link in your system browser. Wamp Server - (https://www.wampserver.com/en/)
Under Downloads, Download the latest version of WAMP server for 32bit or 64bit machine.
Install Wamp-Apache server with all the default settings.
Make sure the Wamp-Apache server is present in C:\ directory
Configure a HTTP server
Navigate to C:\wamp64\bin\apache\apache2.4.46\conf
Open httpd.conf file with an editor.
Change the below lines into system IP address
Listen {System-IP-Address}:80
ServerName {System-IP-Address}:80
Eg: Listen 192.168.1.4:80
ServerName 192.168.1.4:80Save the file and Exit.
Open command prompt and run with Administrator Privilege's.
Navigate to directory C:\wamp64\bin\apache\apache2.4.46\bin
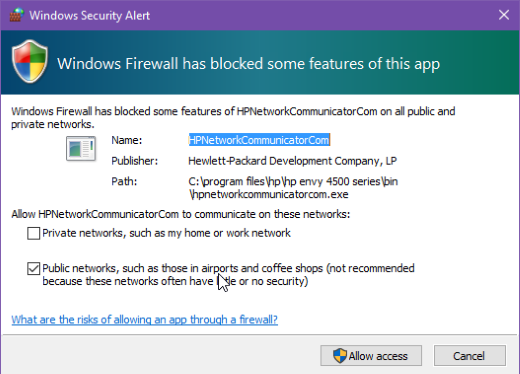
Add Apache as a Windows Service:
httpd.exe -k installWhile the install is in progress, you will be prompted to Windows Network Access page as shown below. Make sure you allow both Private and Public network access.
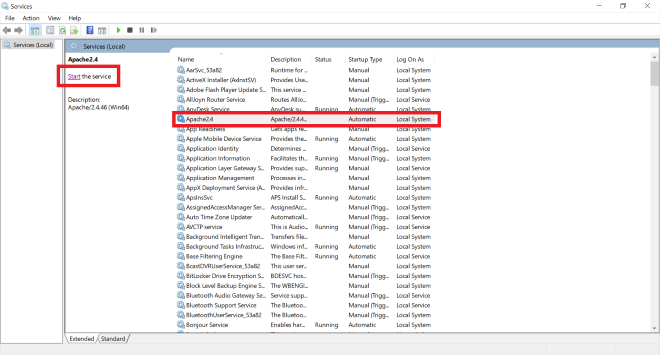
Start Apache Service in Windows
Open RUN in windows using WIN+R button.
Input "services.msc" into RUN
This will open your Windows System Services
In the list of services running you can find Apache2.x present.
Start the service as shown below
Now that your Apache has started and running, check it by using your browser. Open a Web browser and type the machine IP in the address bar and hit Enter. You should see the below, if server has started successfully.
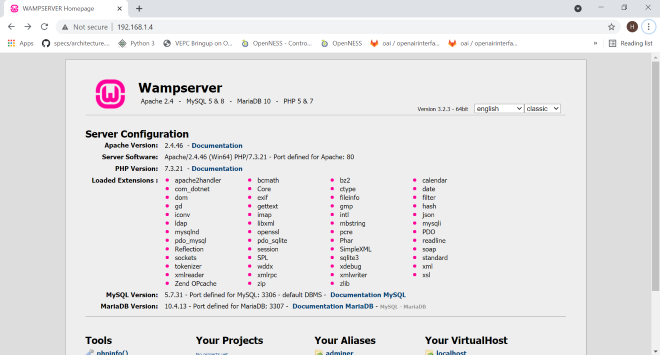
As you can see the connection is "Not Secure" means it is running HTTP server.
Configure HTTP Wamp-Apache Server to Download firmware
Goto the Wamp Root directory, in my case it is C:\wamp64 and navigate to "www" folder C:\wamp64\www.
Create a new folder in that directory, in my case I created a folder named "Firmware". [Folder Structure: C:\wamp64\www\Firmware]
In the "Firmware" folder create an "index.html" file and write below contents to the file.
<!DOCTYPE html>
<html>
<body>
<h2>Using a Relative File Path</h2>
<a href="firmware.rps" download>Download_Version_6</a><br><br>
<a href="firmware1.rps" download>Download_Version_4</a>
</body>
</html>This code will link your resources to Apache server, so that those files can be downloaded.
you can edit href values in the index.html to your firmware file names.
Make sure to copy all the firmware files into the present directory, C:\wamp64\www\Firmware. Save the file and Exit.
<a href="<your-firmware-file>-1.rps" download>Download_Version_6</a><br><br> <a href="<your-firmware-file>-2.rps" download>Download_Version_4</a>Configure HTTPD.conf file for Wamp-Apache Server
Open httpd.conf file in C:\wamp64\bin\apache\apache2.4.46\conf\httpd.conf
Search or Find "DocumentRoot" and change it to below configuration. Save the file and Exit
"${INSTALL_DIR}/www/Firmware"Restart Apache Service
Open Windows services, "WIN+R" → "services.msc" → ENTER
Check for Apache service and Restart the service
In the above configuration, we have created a resource for our server in "Firmware" folder.
Our access resource URL looks as shown below
http://<your-ip-address>/<Sub-Resource-Directory>/<Resources>Eg: http://192.168.1.4/Firmware/firmware.rps http://192.168.1.4/Firmware/firmware1.rps
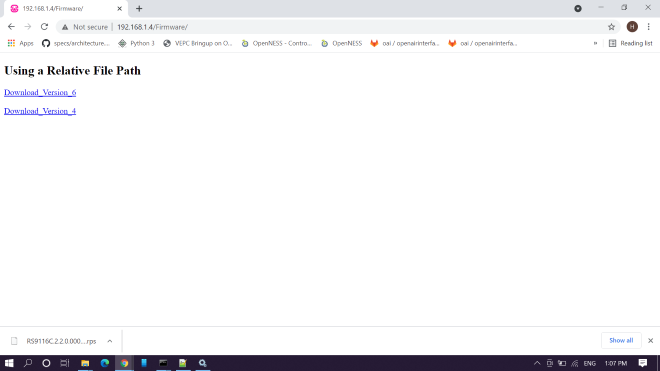
Giving the
http://<your-ip-address>/<Sub-Resource-Directory>in browser should load as shown below. Clicking on any link should download the Firmware files.
Get the resource Information and test with Application
In the RS9116 FOTA application, make below changes and test application this should start downloading firmware.
#define HTTP_SERVER_IP_ADDRESS "192.168.1.4" //Replace this values related to your requirements #define HTTP_URL "Firmware/RS9116C.2.2.0.0006.rps" //HTTP GET request resource name #define HTTP_HOSTNAME "192.168.1.4"//Replace this values related to your requirementsWarning: Make sure that you are able to Access the WAMP-Apache Server (with its IP Address) is accessible to other systems in the same network, if not follow the Changing PHP Configurations. Else proceed with next steps
Changing PHP Configuration
The below steps to be done only when you face an issue of not able to access the WAMP-Server from other machines in the network. Issue shown below :

Give permissions to the newly created resource
"<Sub-Resource-Directory>"Open "phpmyadmin.conf" file in "C:\wamp64\alias\phpmyadmin.conf"
Add the line shown below into the end of file "phpmyadmin.conf" file. Save and exit the file.
<Directory "c:/wamp64/www/<Sub-Resource-Directory>/"> For example, <Directory "c:/wamp64/www/Firmware/"> Options +Indexes +FollowSymLinks +MultiViews AllowOverride all Require all granted </Directory>Restart Apache service and now the resource should be accessible from any systems connected in the same network.
Note: Even though if you are not able to access
http://<your-ip-address>/this page directly, you will be able to access your resources from herehttp://<your-ip-address>/<Sub-Resource-Directory>/as we gave only permissions for this
6.4 Configuring and Uploading Firmware on Apache HTTPs:#
HTTPs Sever configuration for Apache requires Wamp server, if you have not installed it, follow the "Step 1: Download and Install Wamp-Apache Server" step and continue with the HTTPS steps in this document.
Download and Install OPENSSL for windows
OpenSSL for windows from here (https://slproweb.com/products/Win32OpenSSL.html).
Do default install for OpenSSL.
We can only run OpenSSL using command prompt, for that we need to first find the openssl.exe file.
Normally it will be in "C:\Program Files\OpenSSL-Win64\bin\openssl.exe"
Generate required certs
Note: If you already have the reqired certs to run the server then, skip the Generate required certs step, copy your certs to
C:\wamp64\bin\apache\apache2.4.46\confdirectory and update thehttpd-ssl.conffile with these certificate paths shown in HTTPD Configuration step.Open Command Prompt in Administrator privilege's.
Change directory to your openssl.exe file "cd C:\Program Files\OpenSSL-Win64\bin"
Execute the below command to generate a private.key file with AES 256 encryption.
openssl.exe genrsa -aes256 -out private.key 2048
openssl.exe rsa -in private.key -out private.key
openssl.exe req -new -x509 -nodes -sha1 -key private.key -out certificate.crt -days 36500 -config <your-wamp-apache-openssl.conf-file-path>
openssl.exe req -new -x509 -nodes -sha1 -key private.key -out certificate.crt -days 36500 -config C:\wamp64\bin\apache\apache2.4.46\conf\openssl.confNow there will be two files created [Private.key and certificate.crt] in "C:\Program Files\OpenSSL-Win64\bin" directory, copy them to "C:\wamp64\bin\apache\apache2.4.46\conf"
HTTPD Configuration
Open "httpd.conf" file in "C:\wamp64\bin\apache\apache2.4.46\conf"
Uncomment the below shown lines in that file. Save and Exit.
LoadModule ssl_module modules/mod_ssl.so Include conf/extra/httpd-ssl.conf LoadModule socache_shmcb_module modules/mod_socache_shmcb.soOpen "php.ini" file in "C:\wamp64\bin\php\php5.6.40" and uncomment the below line in the file
extension=php_openssl.dllOpen "httpd-ssl.conf" file in "C:\wamp64\bin\apache\apache2.4.46\conf\extra" and update the below paths with proper information (i.e provide system relative paths)
<VirtualHost default:443> General setup for the virtual host DocumentRoot "C:/wamp64/www" ServerName 192.168.43.85:443 ServerAdmin admin@example.com ErrorLog "C:/wamp64/bin/apache/apache2.4.46/logs/error.log" TransferLog "C:/wamp64/bin/apache/apache2.4.46/logs/access.log" SSLCertificateFile "C:/wamp64/bin/apache/apache2.4.46/conf/certificate.crt" SSLCertificateKeyFile "C:/wamp64/bin/apache/apache2.4.46/conf/private.key"Run below command to check if the configurations given above are proper or not. If the configurations are proper, it will return "Syntax OK"
httpd.exe -t
Configure HTTPS Wamp-Apache Server to Download firmware
Goto the Wamp Root directory "C:\wamp64" and navigate to "www"
Create a new folder in that directory "Firmware". [Folder Structure: C:\wamp64\www\Firmware]
In the "Firmware" folder create an "index.html" file and write below contents to the file.
<!DOCTYPE html>
<html>
<body>
<h2>Using a Relative File Path</h2>
<a href="firmware.rps" download>Download_Version_6</a><br><br>
<a href="firmware1.rps" download>Download_Version_4</a>
</body>
</html>This code will link your resources to Apache server, so that those files can be downloaded.
Make sure to copy all the firmware files into the present directory, C:\wamp64\www\Firmware
you can edit href values in the index.html to your firmware file names.
<a href="<your-firmware-file>-1.rps" download>Download_Version_6</a><br><br>
<a href="<your-firmware-file>-2.rps" download>Download_Version_4</a>Save the file and Exit.
Restart Server
Open RUN, "WIN+R" → "services.msc" → ENTER
Restart the Apache service.
Open browser and give your Apache server URL
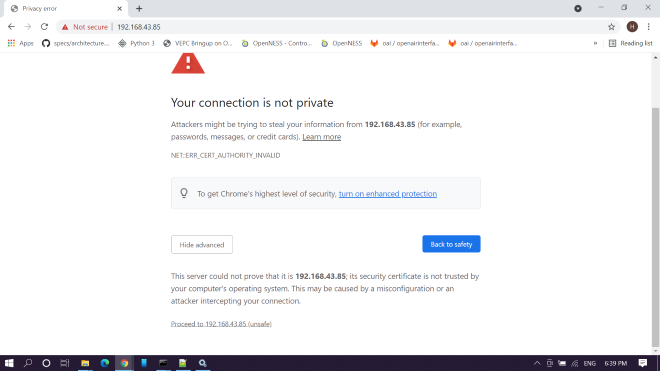
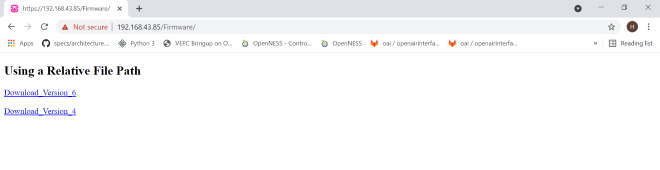
Here click on "Advanced Settings" and click on "Proceed to 192.168.43.85 (unsafe)"
You will be able to access the page and resources in HTTPS.
Note: Make sure to check your HTTPS server from other local machines present in the same network. It should be accessible.